Torch Exhaust Flamethrower Kit
After more than a decade, the Torch Exhaust Flamethrower Kit will be up for sale worldwide. This kit started as a simple project of mine some 15 years ago to get, what was then, my 1991 Chevy Camaro RS to shoot flames. I went through a dozen of prototypes and revisions before settling on what worked on my car. I then went on to make and sell them on eBay as well as an online store I created at the time. Over the span of 3 years, I sold around 300 kits.
Since the recent interest after video of the 2018 prototype on my car went viral, I’m making and selling them again. There is far more engineering and customization incorporated into the new kits that will be up for sale. Countless hours have been spent on the electronics design, newly added Safety Switch and Switch Panel, their new 3D printed enclosures and a comprehensive Instruction Guide. All wiring is now is now color-coded for ease of installation.
The shipped kit will include:
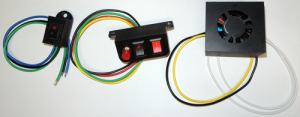
– (1) Safety Switch
– (1) Cockpit Switch Panel
– (1) Torch Brain Box
– Comprehensive Instruction Guide
Description:
The Torch Exhaust Flamethrower Kit works in two guaranteed stages: (1) it provides a solid spark to the tailpipe(s) to ignite raw fuel, and (2) it provides a simple and safe way for momentary ignition cut to provide the raw fuel that is then ignited. This is all detailed in the comprehensive Instruction Guide.
Needed additional components:
To complete the installation of this kit, you will need to purchase additional components. These are detailed in the Needed Components section on the site where you will be directed to Amazon.com products that are tested and known to work properly with this kit.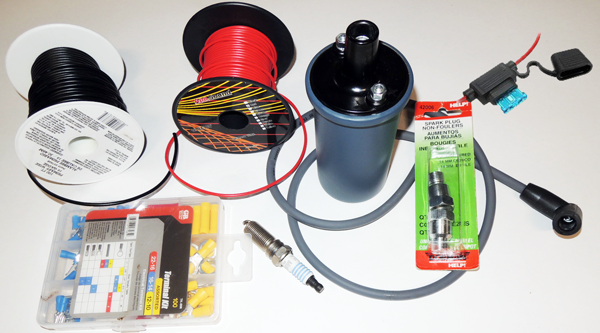
Necessary car modifications:
– Removal of Catalytic Converters: All catalytic converters must be removed from the car. This includes aftermarket high-flow catalytic converters. This kit is optimized to work on least restrictive exhaust setups.
– Ignition Cut Circuit: On the majority of vehicles, there is only ONE wire that will be cut and spliced for the use of this kit which is the common ground wire for the under-hood ignition coil(s). This is detailed in the comprehensive Instruction Guide.
Installation Difficulty:
This depends on the installer’s knowledge of electronics and vehicle modification. The full installation should take around 3-hours if the following conditions are met:
– Find the common ground for the under-hood ignition coil(s).
– Route one 16-gauge wire from the engine bay to the cockpit Switch Panel.
– Locate an accessory ON +12V source tapped for the Switch Panel.
– Route one 16-gauge wire from the Switch panel to the trunk of the car.
– Find a proper place for the Torch Brain Box.
– Find proper mounting places for the coils in or under the trunk space.
– Have the tools to drill the hole(s) in the exhaust tip(s).
– Use of a Dremel to cut the tips off of the non-foulers to create bungs.
– Access to a welder to weld the modified bung(s) to the tailpipe(s).
$124.99
+Shipping and handling.