ARCHIVED Blog: Checklist for locals looking to have the kit installed.

Alright, folks! For all of the locals looking to have the kit fully installed including testing, please follow the checklist. I live in Chicago near O’Hare Airport (not too far from either I-90 exits for Cumberland or Harlem). I’m only charging $120 for the install, which is $5 less than what the kit will sell for online. The only trade-off is that I take pictures of the installation and video of it working.

The install will take the two of us around 3 hours if we have all of the tools and components. Here’s what I have:

  • Drill and various bits for wire routing and spark plug installation.
  • Various box wrenches, sockets and screw drivers.
  • Dremel with cutting bits to make the spark plug bungs.
  • Welder for the spark plug bungs.
  • Digital Multimeter to check all of the electrical connections.
  • Solder station and heat shrink tubing.
  • A standard AC Delco car jack. NOTE: If your car is slammed and/or has body effects that won’t clear a standard jack, you will need to bring one! My Mazdaspeed3 has CorkSport lowering springs, and I barely get my jack under the car.

What I need from you:

  • First off, your car cannot have any catalytic converters on it. None, not even a high-flow cat. By the end of the install, there is a good chance you won’t see a single flame even through everything else is working properly.
  • Second, get in touch with me and we will set a date and time. You can find me under “Matt Torch” on Facebook.
  • IMPORTANT: You need to locate the common ground wire for the ignition coil pack(s) under the hood of your car. There should be a single wire that supplies DC ground to your ignition coils. If you own a Mazdaspeed3/6, I know exactly what wire to tap. For all other cars, the reason the install price is lower than the actual online kit price is so that I can gather this information.
  • Order the needed components in advance. All of what is needed can be found on the NEEDED COMPONENTS page.
  • Download and look over the INSTRUCTION GUIDE. This will help you know exactly what we will need to do to your car.
  • You need to run these wires:
    – One 16 gauge wire from the engine bay to where you plan to place the switch panel.
    – One 16 gauge wire from the switch panel placement to the trunk.
    – Locate and tap an Accessory ON wire in the cockpit.

This won’t be a one-person install by me. I will need your help with some of the install. You should bring some clothes that you’re willing to get dirty. I have an insulated garage that is well lit, so the weather won’t play a role.

I also have both an O’Reilly Auto and an AutoZone within a mile from from house if we would need anything. However, do not overlook the NEEDED COMPONENTS section thinking that buying local will save you some money. I chose all of those components because I personally tested all of them, but also because they are inexpensive.

Leave a Reply

Torch Kit


HISTORY OF THE TORCH EXHAUST FLAME KIT:

After more than a decade, the Torch Exhaust Flamethrower Kit is for sale worldwide. This kit started as a simple project more than 15 years ago to get, what was then, my 1991 Chevy Camaro RS to shoot flames. It went through many stages of prototyping before being sold in the early 2000’s on eBay and an online store. Over the span of 3 years, more than 300 kits were made and sold.
In early 2018, video of the kit on my 2010 Mazdaspeed3 went viral which was the same exact kit that was on my old 95 TransAm some 15 years ago. The kit was dusted off, installed on my Speed3 and worked as if it were brand new! This is when I decided to bring the kit back for the newer generation of car enthusiasts.
Since then, the kit has been re-designed to be user-friendly. The main component enclosures for the Under-hood Safety Switch, Cockpit Switch Panel and the Torch Control Box are 3D printed. Each enclosure is sealed with a rubberized coating for look, durability and feel. All wiring for the main components are now color-coded to take out the guess work of installation.

UNIVERSAL KITS INCLUDE ALL NEEDED COMPONENTS

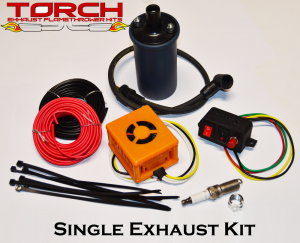
The Single/Dual Torch Exhaust Kits include:
– Switch Panel
– Torch Control Box
– Red and Black Wire (20ft each)
– Barrel Coil(s)
– Spark Plug Wire(s)
– Spark Plug(s)
– Spark Plug Bung(s)
– Zip Ties
– Instruction Guide
Description:
Each exhaust flame kit is universal and will work on any gasoline car or truck with catalytic converters deleted. SINGLE and DUAL exhaust kits are available and are guaranteed to: (1) provide a simple and safe way to momentarily cut engine ignition spark to provide raw fuel through the system, and (2) to provide a strong spark to the tailpipe(s) to ignite the raw fuel.
Necessary car modifications:
Removal of Catalytic Converters: All catalytic converters must be removed from the car. This includes aftermarket high-flow catalytic converters. This kit is optimized to work on least restrictive exhaust setups.
Ignition Cut Circuit: On the majority of vehicles, there is only ONE wire that will be cut and spliced for the use of this kit which is the common ground wire for the under-hood ignition coil(s). This is detailed in the comprehensive Instruction Guide.
Installation Difficulty:
This depends on the installer’s knowledge of electronics and vehicle modification. The full installation should take around 3-hours if the following conditions are met:

– Find the common ground for the under-hood ignition coil(s).
– Route one 16-gauge wire from the engine bay to the cockpit Switch Panel.
– Locate an accessory ON +12V source tapped for the Switch Panel.
– Route one 16-gauge wire from the Switch panel to the trunk of the car.
– Find a proper place for the Torch Control Box in the rear of the vehicle
– Find proper mounting places for the coils in or under the trunk space.
– Have the tools to drill the hole(s) in the exhaust tip(s).
– The spark plug bungs should be welded, but can be used as nuts tightened from the inside of the exhaust tailpipe.


SINGLE EXHAUST KIT
DUAL EXHAUST KIT
Torch Exhaust Flamethrower Kit: Motorcycle Kit
MOTORCYCLE KIT